In this post, we’re going to cover adding a standalone instance of SQL Server 2017 on Linux to an Active Directory Domain, so that we can use Windows authentication. We’ll mostly be following documentation provided by Microsoft, with just a few deviations.
I see this as being one of the more common use-cases for customers looking to integrate SQL Server on Linux, and is actually fairly straight forward. The process we’ll follow here is a bit more long-winded than just copy and pasting from the Microsoft documentation, but I feel it’s important to take your time and understand what you’re doing the first few times.
In part II of this post, due out soon, we’ll take this node and add it to an Availability Group, so stay tuned…
Here’s our environment setup:
- Server OS: CentOS-7-x86_64-Everything-1708, with Infrastructure Server software selection chosen. Get it here
- Virtualization: Hyper-V 2016 host
- Server name: sqllinux01
- Server IP: 192.168.80.10
- Domain Name: ufp.cloud (AD domain name)
- DNS Servers: 192.168.5.1, 192.168.5.2 (AD domain controllers)
- Local User: dbadave (We’ll log in as this user, and use it to run commands)
- Domain Admin User Name: dbadave@ufp.cloud (Used to join machine to AD domain)
- SQL Service Account: sqlserver@ufp.cloud (we’ll use this for the SPN creation)
Assumptions:
- Working, reasonably healthy Active Directory Infrastructure
- VM built; OS installed and sitting on a login screen
- Network Time enabled during installation
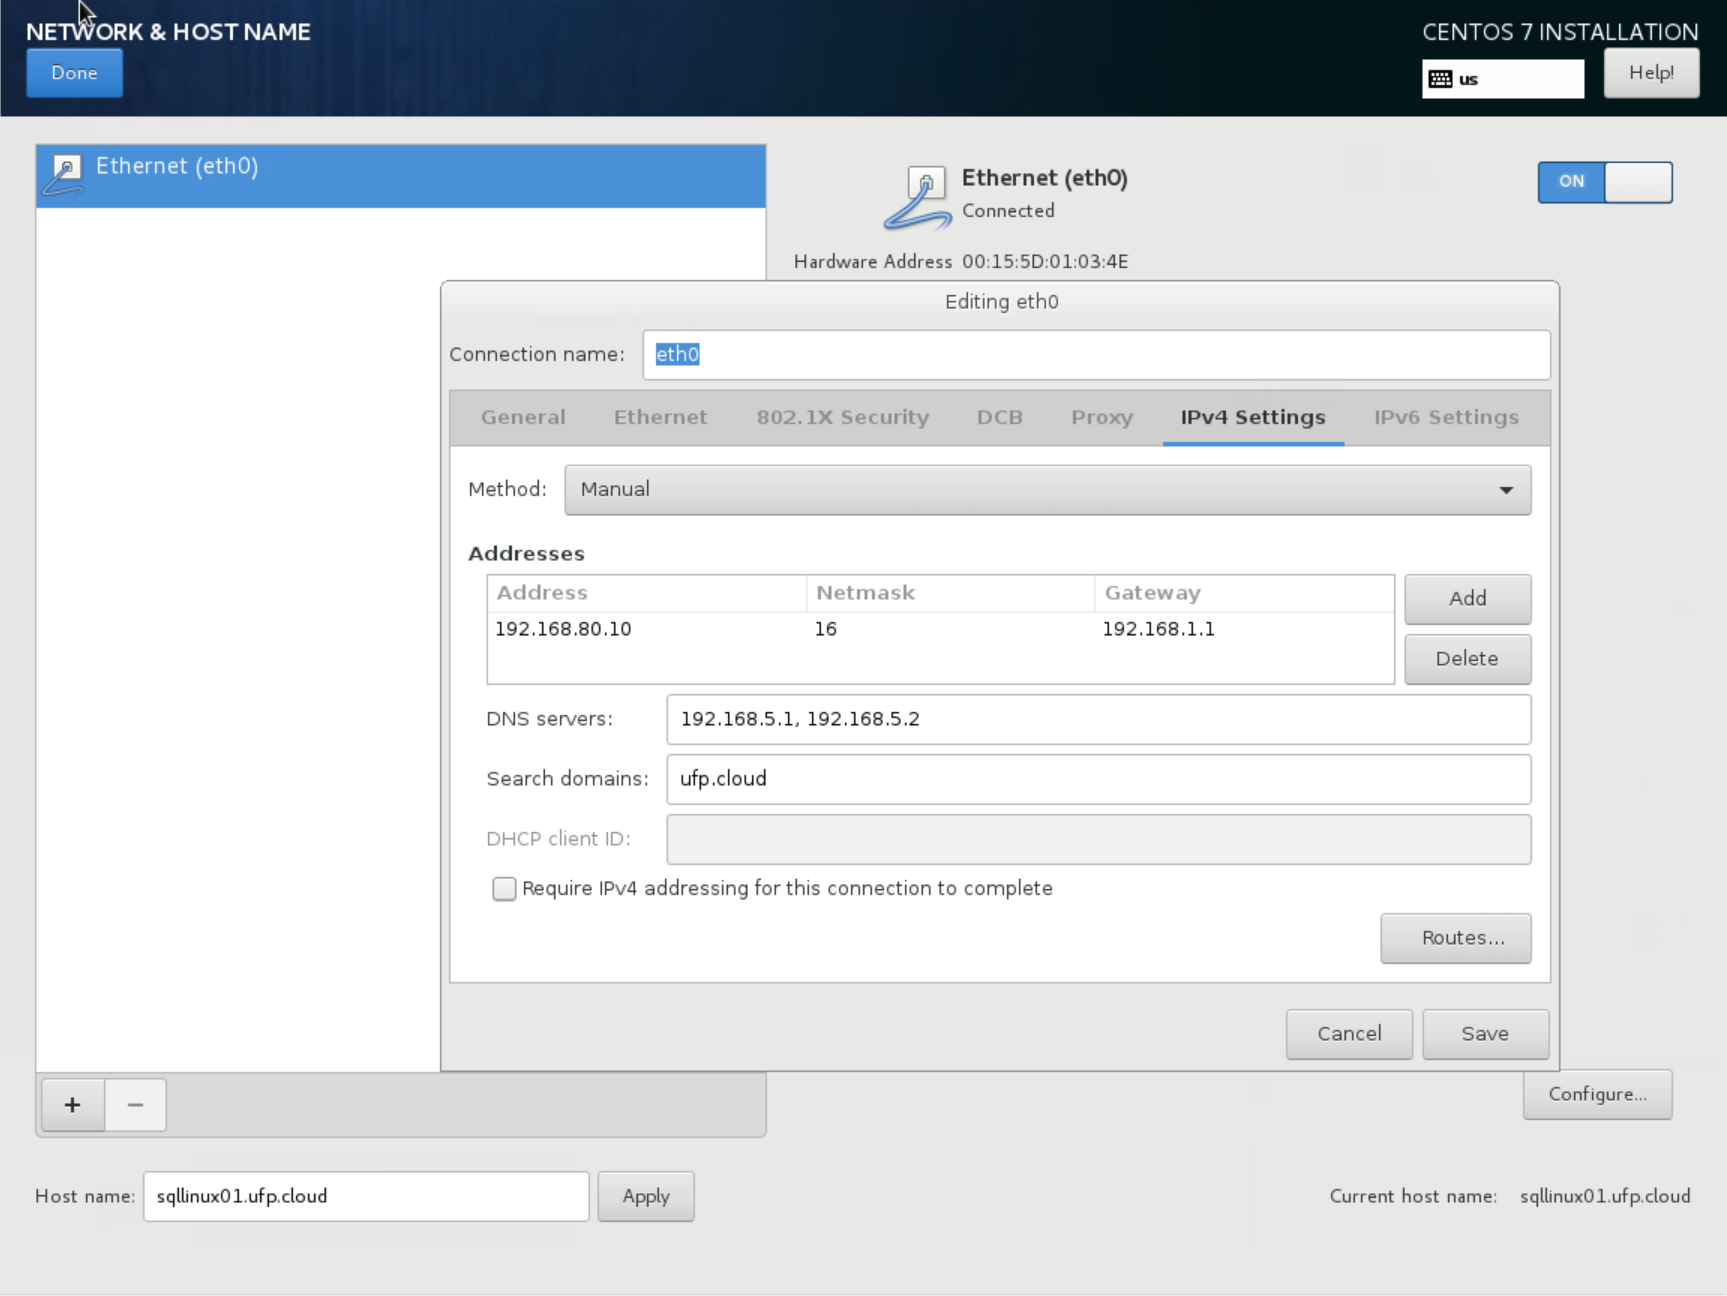
- All IP, DNS, Hostname, and Search domain configuration done during installation ( screen shot below)
- Network interface enabled on boot (not enabled by default… Hmm…)
- Non-root user dbadave created during installation, and made administrator (checkbox on installation)
- All traffic allowed between subnets on the Hyper-V 2016 host
- Using Documentation from Microsoft; Available here
- Using PuTTY as our terminal. Get it here
For reference, here’s a screenshot showing my network config during installation:
One very important note:
We’re using CentOS here, due to Red Hat Enterprise Linux (RHEL) requirements for having a support subscription to access certain packages that I need to build out Availability Groups during SQL Saturdays and other sessions. However, CentOS is almost identical to RHEL, just without the branding and support requirements. Certainly close enough to follow the same documentation. Unfortunately, it’s not on the list of fully supported operating systems for SQL Server 2017 on Linux – probably due to lack of paid support.
While CentOS works great for doing demos, please make sure you use supported OS’s in production.
Alright; let’s get started!
First thing we’ll do is use PuTTY to ssh in to the freshly built server, and log in as the User created during setup (dbadave)
[dbadave@sqllinux01 ~]$
OK; looks pretty empty; not much going on here. Let’s change that!
First thing I like to do is update, so let’s do that now.
[dbadave@sqllinux01 ~]$ sudo yum update && sudo yum upgrade -y
Being a Linux box, it’s going to ask you for your password. This distribution also likes to quote Spider-Man at you. Or was uncle Ben a Unix geek? The world may never know.
[dbadave@sqllinux01 ~]$ sudo yum update && sudo yum upgrade

We trust you have received the usual lecture from the local System
Administrator. It usually boils down to these three things:

    #1) Respect the privacy of others.
    #2) Think before you type.
    #3) With great power comes great responsibility.

[sudo] password for dbadave:
Given the large amount of updates I had to apply (223, in this case) I opted to reboot. Unless it prompts you, its generally optional tho.
Now that updates are out of the way, let’s start installing the required packages to get AD Auth working.
Per documentation for RHEL, we should just need the following packages:
realmd and krb5-workstation
Easy enough, let’s install them:
sudo yum install realmd krb5-workstation
And we get presented with the following:
===================================================================================
 Package                  Arch           Version                Repository    Size
===================================================================================
Installing:
 krb5-workstation         x86_64         1.15.1-8.el7           base         811 k
 realmd                   x86_64         0.16.1-9.el7           base         208 k
Installing for dependencies:
 libkadm5                 x86_64         1.15.1-8.el7           base         174 k
 oddjob                   x86_64         0.31.5-4.el7           base          69 k
 oddjob-mkhomedir         x86_64         0.31.5-4.el7           base          38 k
 psmisc                   x86_64         22.20-15.el7           base         141 k

Transaction Summary
===================================================================================
Install  2 Packages (+4 Dependent packages)

Total download size: 1.4 M
Installed size: 4.0 M
Is this ok [y/d/N]:
What this is telling us is that the package manager found some dependencies that need to be squared away before thoe two packages can be installed. Pretty smart! let’s just answer ‘Y’ here to allow this to happen. We could have just run the yum command with the the -y flag to bypass the permission part, but I think it’s a good idea to understand what’s going on. After you’ve done this a few times, you’ll be set to just skip the extra messages.
After input, the package manager immediately goes to work, and finishes rather quickly:
Downloading packages:
(1/6): krb5-workstation-1.15.1-8.el7.x86_64.rpm             | 811 kB  00:00:00
(2/6): libkadm5-1.15.1-8.el7.x86_64.rpm                     | 174 kB  00:00:00
(3/6): oddjob-0.31.5-4.el7.x86_64.rpm                       |  69 kB  00:00:00
(4/6): oddjob-mkhomedir-0.31.5-4.el7.x86_64.rpm             |  38 kB  00:00:00
(5/6): realmd-0.16.1-9.el7.x86_64.rpm                       | 208 kB  00:00:00
(6/6): psmisc-22.20-15.el7.x86_64.rpm                       | 141 kB  00:00:09
-----------------------------------------------------------------------------------
Total                                                 135 kB/s | 1.4 MB  00:10
Running transaction check
Running transaction test
Transaction test succeeded
Running transaction
  Installing : psmisc-22.20-15.el7.x86_64                                      1/6
  Installing : oddjob-0.31.5-4.el7.x86_64                                      2/6
  Installing : oddjob-mkhomedir-0.31.5-4.el7.x86_64                            3/6
  Installing : libkadm5-1.15.1-8.el7.x86_64                                    4/6
  Installing : krb5-workstation-1.15.1-8.el7.x86_64                            5/6
  Installing : realmd-0.16.1-9.el7.x86_64                                      6/6
  Verifying  : realmd-0.16.1-9.el7.x86_64                                      1/6
  Verifying  : oddjob-0.31.5-4.el7.x86_64                                      2/6
  Verifying  : krb5-workstation-1.15.1-8.el7.x86_64                            3/6
  Verifying  : oddjob-mkhomedir-0.31.5-4.el7.x86_64                            4/6
  Verifying  : psmisc-22.20-15.el7.x86_64                                      5/6
  Verifying  : libkadm5-1.15.1-8.el7.x86_64                                    6/6

Installed:
  krb5-workstation.x86_64 0:1.15.1-8.el7        realmd.x86_64 0:0.16.1-9.el7

Dependency Installed:
  libkadm5.x86_64 0:1.15.1-8.el7                oddjob.x86_64 0:0.31.5-4.el7
  oddjob-mkhomedir.x86_64 0:0.31.5-4.el7        psmisc.x86_64 0:22.20-15.el7

Complete!
[dbadave@sqllinux01 ~]$
Everything looks good here, so on to the next step. We’ve already addressed the network configuration step listed next in the Microsoft documentation during installation, so let’s skip that step.
Step 4: Join the domain
This is where we’ll use the Realmd package we downloaded earlier
This command tells our server to discover how to connect to our domain through DNS, and join the domain
sudo realm join ufp.cloud -U 'dbadave@UFP.CLOUD' -v
And here’s what we get back:
 * Resolving: _ldap._tcp.ufp.cloud
 * Performing LDAP DSE lookup on: 192.168.5.2
 * Performing LDAP DSE lookup on: 192.168.5.1
 * Successfully discovered: ufp.cloud
Password for dbadave@UFP.CLOUD:
So far so good – Realm discovered our domain just fine. Now it’s asking us to enter in our domain user password to complete the process, so let’s do that. Here’s what we get back:
Password for dbadave@UFP.CLOUD:
 * Couldn't find file: /usr/sbin/sssd
 * Required files: /usr/sbin/oddjobd, /usr/libexec/oddjob/mkhomedir, /usr/sbin/sssd, /usr/bin/net
 * Resolving required packages
 ! PackageKit not available: The name org.freedesktop.PackageKit was not provided by any .service files
 ! Necessary packages are not installed: oddjob, oddjob-mkhomedir, sssd, samba-common-tools
realm: Couldn't join realm: Necessary packages are not installed: oddjob, oddjob-mkhomedir, sssd, samba-common-tools
Woah! our first error!
None of the dependencies were listed in previous steps, however there is a note that seems to fit our situation:
“If you see an error, “Necessary packages are not installed,” then you should install those packages using your Linux distribution’s package manager before running the realm join command again.”
OK, no problem. Let’s install the packages it is asking us to install:
sudo yum install oddjob oddjob-mkhomedir sssd samba-common-tools
And here’s what we get back:
===================================================================================
 Package                 Arch        Version                    Repository    Size
===================================================================================
Installing:
 samba-common-tools      x86_64      4.6.2-12.el7_4             updates      456 k
 sssd                    x86_64      1.15.2-50.el7_4.11         updates      121 k
Installing for dependencies:
 avahi-libs              x86_64      0.6.31-17.el7              base          61 k
 c-ares                  x86_64      1.10.0-3.el7               base          78 k
 cups-libs               x86_64      1:1.6.3-29.el7             base         356 k
 cyrus-sasl-gssapi       x86_64      2.1.26-21.el7              base          41 k
 http-parser             x86_64      2.7.1-5.el7_4              updates       28 k
 libbasicobjects         x86_64      0.1.1-27.el7               base          25 k
 libcollection           x86_64      0.6.2-27.el7               base          41 k
 libdhash                x86_64      0.4.3-27.el7               base          28 k
 libini_config           x86_64      1.3.0-27.el7               base          63 k
 libipa_hbac             x86_64      1.15.2-50.el7_4.11         updates      129 k
 libldb                  x86_64      1.1.29-1.el7               base         128 k
 libnfsidmap             x86_64      0.25-17.el7                base          49 k
 libpath_utils           x86_64      0.2.1-27.el7               base          27 k
 libref_array            x86_64      0.1.5-27.el7               base          26 k
 libsmbclient            x86_64      4.6.2-12.el7_4             updates      130 k
 libsss_autofs           x86_64      1.15.2-50.el7_4.11         updates      131 k
 libsss_certmap          x86_64      1.15.2-50.el7_4.11         updates      151 k
 libsss_sudo             x86_64      1.15.2-50.el7_4.11         updates      129 k
 libtalloc               x86_64      2.1.9-1.el7                base          33 k
 libtdb                  x86_64      1.3.12-2.el7               base          47 k
 libtevent               x86_64      0.9.31-2.el7_4             updates       36 k
 libwbclient             x86_64      4.6.2-12.el7_4             updates      104 k
 pytalloc                x86_64      2.1.9-1.el7                base          16 k
 python-sssdconfig       noarch      1.15.2-50.el7_4.11         updates      155 k
 samba-client-libs       x86_64      4.6.2-12.el7_4             updates      4.7 M
 samba-common            noarch      4.6.2-12.el7_4             updates      197 k
 samba-common-libs       x86_64      4.6.2-12.el7_4             updates      164 k
 samba-libs              x86_64      4.6.2-12.el7_4             updates      265 k
 sssd-ad                 x86_64      1.15.2-50.el7_4.11         updates      226 k
 sssd-common             x86_64      1.15.2-50.el7_4.11         updates      1.3 M
 sssd-common-pac         x86_64      1.15.2-50.el7_4.11         updates      183 k
 sssd-ipa                x86_64      1.15.2-50.el7_4.11         updates      318 k
 sssd-krb5               x86_64      1.15.2-50.el7_4.11         updates      159 k
 sssd-krb5-common        x86_64      1.15.2-50.el7_4.11         updates      194 k
 sssd-ldap               x86_64      1.15.2-50.el7_4.11         updates      227 k
 sssd-proxy              x86_64      1.15.2-50.el7_4.11         updates      155 k

Transaction Summary
===================================================================================
Install  2 Packages (+36 Dependent packages)

Total download size: 11 M
Installed size: 29 M
Is this ok [y/d/N]:
Wow, that’s a lot of additional packages… This is pretty common with Linux, as dependencies can have dependencies.
Well, we obviously need them, so let’s go ahead and respond with ‘Y’. We’ll see lots of text scroll by as before, but we’ll eventually see this screen:
Dependency Installed:
  avahi-libs.x86_64 0:0.6.31-17.el7               c-ares.x86_64 0:1.10.0-3.el7
  cups-libs.x86_64 1:1.6.3-29.el7                 cyrus-sasl-gssapi.x86_64 0:2.1.26-21.el7
  http-parser.x86_64 0:2.7.1-5.el7_4              libbasicobjects.x86_64 0:0.1.1-27.el7
  libcollection.x86_64 0:0.6.2-27.el7             libdhash.x86_64 0:0.4.3-27.el7
  libini_config.x86_64 0:1.3.0-27.el7             libipa_hbac.x86_64 0:1.15.2-50.el7_4.11
  libldb.x86_64 0:1.1.29-1.el7                    libnfsidmap.x86_64 0:0.25-17.el7
  libpath_utils.x86_64 0:0.2.1-27.el7             libref_array.x86_64 0:0.1.5-27.el7
  libsmbclient.x86_64 0:4.6.2-12.el7_4            libsss_autofs.x86_64 0:1.15.2-50.el7_4.11
  libsss_certmap.x86_64 0:1.15.2-50.el7_4.11      libsss_sudo.x86_64 0:1.15.2-50.el7_4.11
  libtalloc.x86_64 0:2.1.9-1.el7                  libtdb.x86_64 0:1.3.12-2.el7
  libtevent.x86_64 0:0.9.31-2.el7_4               libwbclient.x86_64 0:4.6.2-12.el7_4
  pytalloc.x86_64 0:2.1.9-1.el7                   python-sssdconfig.noarch 0:1.15.2-50.el7_4.11
  samba-client-libs.x86_64 0:4.6.2-12.el7_4       samba-common.noarch 0:4.6.2-12.el7_4
  samba-common-libs.x86_64 0:4.6.2-12.el7_4       samba-libs.x86_64 0:4.6.2-12.el7_4
  sssd-ad.x86_64 0:1.15.2-50.el7_4.11             sssd-common.x86_64 0:1.15.2-50.el7_4.11
  sssd-common-pac.x86_64 0:1.15.2-50.el7_4.11     sssd-ipa.x86_64 0:1.15.2-50.el7_4.11
  sssd-krb5.x86_64 0:1.15.2-50.el7_4.11           sssd-krb5-common.x86_64 0:1.15.2-50.el7_4.11
  sssd-ldap.x86_64 0:1.15.2-50.el7_4.11           sssd-proxy.x86_64 0:1.15.2-50.el7_4.11

Complete!
[dbadave@sqllinux01 ~]$
OK, everything looks good; Let’s try our realm command again:
sudo realm join ufp.cloud -U 'dbadave@UFP.CLOUD' -v
Same as before, our domain is found, and we’re prompted to enter our domain user password.
However, this time we don’t get an error:
Resolving: _ldap._tcp.ufp.cloud
 * Performing LDAP DSE lookup on: 192.168.5.1
 * Successfully discovered: ufp.cloud
Password for dbadave@UFP.CLOUD:
 * Required files: /usr/sbin/oddjobd, /usr/libexec/oddjob/mkhomedir, /usr/sbin/sssd, /usr/bin/net
 * LANG=C LOGNAME=root /usr/bin/net -s /var/cache/realmd/realmd-smb-conf.348ZHZ -U dbadave@UFP.CLOUD ads join ufp.cloud
Enter dbadave@UFP.CLOUD's password:
Using short domain name -- UFP
Joined 'SQLLINUX01' to dns domain 'ufp.cloud'
 * LANG=C LOGNAME=root /usr/bin/net -s /var/cache/realmd/realmd-smb-conf.348ZHZ -U dbadave@UFP.CLOUD ads keytab create
Enter dbadave@UFP.CLOUD's password:
 * /usr/bin/systemctl enable sssd.service
Created symlink from /etc/systemd/system/multi-user.target.wants/sssd.service to /usr/lib/systemd/system/sssd.service.
 * /usr/bin/systemctl restart sssd.service
 * /usr/bin/sh -c /usr/sbin/authconfig --update --enablesssd --enablesssdauth --enablemkhomedir --nostart &&
/usr/bin/systemctl enable oddjobd.service && /usr/bin/systemctl start oddjobd.service
 * Successfully enrolled machine in realm
[dbadave@sqllinux01 ~]$
Notice the message above “Successfully enrolled machine in realm”? That’s the realm equivalent of “Welcome to the ufp.cloud domain!” you get on Windows machines, just with less popups and fanfare. Our Linux machine is now on the Active Directory domain.
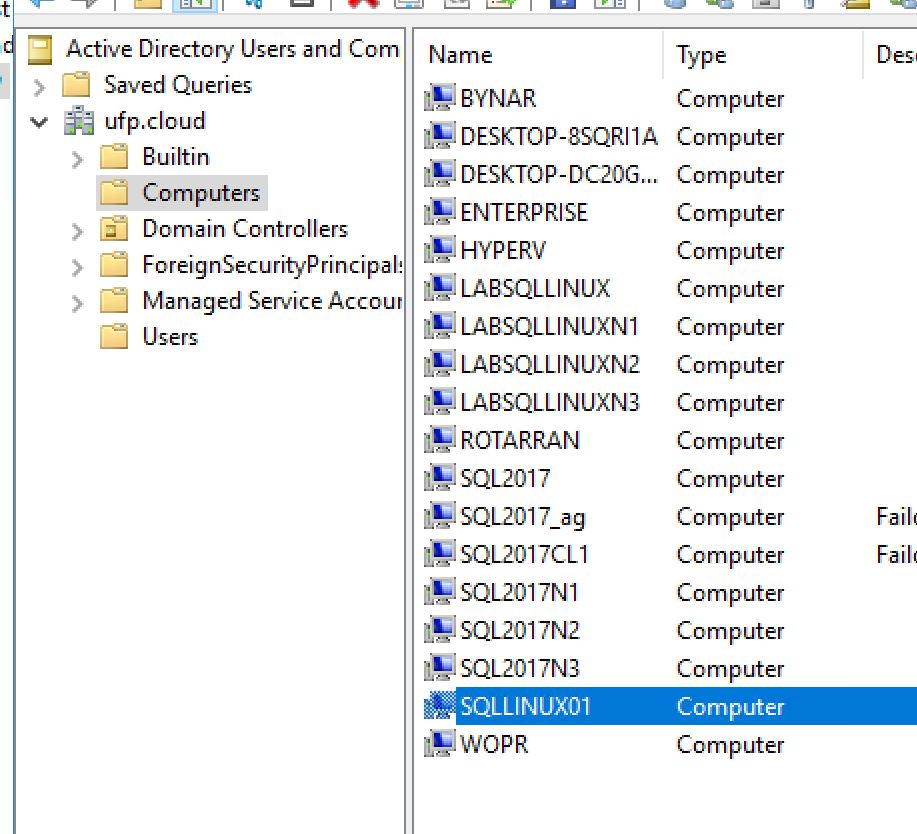
Just for grins, let’s check Active Directory Users and Computers, and see if we can see the computer object:
…And sure enough its there, just as we’d expect with a Windows host
Ok, now let’s validate connectivity with the domain, and make sure we’re able to get our all-important Kerberos ticket. We’re going to run 3 commands at once here, since they’re all related:
- id returns user id and group information about our user
- kinit obtains and caches our ticket. *Note the UPPERCASE domain name*
- klist returns information about the kerberos ticket we grabbed from kinit
So, let’s see what we get:
[dbadave@sqllinux01 ~]$ id dbadave@ufp.cloud
uid=63601123(dbadave@ufp.cloud) gid=63600513(domain users@ufp.cloud) groups=63600513(domain users@ufp.cloud),
63600512(domain admins@ufp.cloud),63600572(denied rodc password replication group@ufp.cloud)
[dbadave@sqllinux01 ~]$ kinit dbadave@UFP.CLOUD
Password for dbadave@UFP.CLOUD:
[dbadave@sqllinux01 ~]$ klist
Ticket cache: KEYRING:persistent:1000:1000
Default principal: dbadave@UFP.CLOUD

Valid starting       Expires              Service principal
04/17/2018 12:52:35  04/17/2018 22:52:35  krbtgt/UFP.CLOUD@UFP.CLOUD
        renew until 04/24/2018 12:52:31
[dbadave@sqllinux01 ~]$
Alright – looks like we can authenticate on the domain, and get a kerberos ticket. Good deal. Everything is looking great. Now let’s go ahead and get SQL Server 2017 installed. We could have done it earlier, but I wanted to get the domain joining out of the way
This is a very easy process. Our first step is to install the Microsoft Repository on the server. This tells the server how to find the SQL Server packages to install. To do that, we download the .repo file, and put it in the right directory. Here’s the command:
sudo curl -o /etc/yum.repos.d/mssql-server.repo https://packages.microsoft.com/config/rhel/7/mssql-server-2017.repo
After we run it, we see this. This is the closest that we get to a confirmation.
  % Total    % Received % Xferd  Average Speed   Time    Time     Time  Current
                                 Dload  Upload   Total   Spent    Left  Speed
100   232  100   232    0     0    494      0 --:--:-- --:--:-- --:--:--   495
[dbadave@sqllinux01 ~]$
Alright, now let’s install SQL Server 2017 on Linux:
sudo yum install mssql-server
After a bit of text scrolls by, we’ll see this.
====================================================================================================
 Package          Arch       Version             Repository                                    Size
====================================================================================================
Installing:
 mssql-server     x86_64     14.0.3023.8-5       packages-microsoft-com-mssql-server-2017     167 M

Transaction Summary
====================================================================================================
Install  1 Package

Total download size: 167 M
Installed size: 167 M
Is this ok [y/d/N]:
One interesting thing here is that the entire SQL Server 2017 installation is only 167 Megabytes. Granted, this is just for the database engine, but still impressively small. Anyway, as before, let’s just respond with ‘Y’.
After the package downloads, you may see this prompt. This is asking you if it’s OK to install the Microsoft key. Answer ‘Y’ here, too.
Downloading packages:
warning: /var/cache/yum/x86_64/7/packages-microsoft-com-mssql-server-2017/packages/mssql-server-14.0.3023.8-5.x86_64.rpm:
Header V4 RSA/SHA256 Signature, key ID be1229cf: NOKEY
Public key for mssql-server-14.0.3023.8-5.x86_64.rpm is not installed
mssql-server-14.0.3023.8-5.x86_64.rpm                                        | 167 MB  00:00:15
Retrieving key from https://packages.microsoft.com/keys/microsoft.asc
Importing GPG key 0xBE1229CF:
 Userid     : "Microsoft (Release signing) <gpgsecurity@microsoft.com>"
 Fingerprint: bc52 8686 b50d 79e3 39d3 721c eb3e 94ad be12 29cf
 From       : https://packages.microsoft.com/keys/microsoft.asc
Is this ok [y/N]:
After a few moments, you should see this, which lets you know installation was successful, but there’s still more to do
Running transaction check
Running transaction test
Transaction test succeeded
Running transaction
  Installing : mssql-server-14.0.3023.8-5.x86_64                                                1/1

+--------------------------------------------------------------+
Please run 'sudo /opt/mssql/bin/mssql-conf setup'
to complete the setup of Microsoft SQL Server
+--------------------------------------------------------------+

SQL Server needs to be restarted in order to apply this setting. Please run
'systemctl restart mssql-server.service'.
  Verifying  : mssql-server-14.0.3023.8-5.x86_64                                                1/1

Installed:
  mssql-server.x86_64 0:14.0.3023.8-5

Complete!
[dbadave@sqllinux01 ~]$
Well, might as go as we’re told. Let’s run the setup command and finish configuration. To do that, we run:
sudo /opt/mssql/bin/mssql-conf setup
We’re now asked to choose our edition of SQL Server 2017. Since this instance will be part of my Availability Group demo, I’m just going to choose ‘Evaluation”. I may be lazy, but even I can get a demo out in 180 days. let’s just enter ‘1’ here. It will then ask us to accept the EULA, then choose and confirm your sa password . So, lets do that, too. After a few moments, it will finish up and tell you SQL Server is installed:
Enter your edition(1-8): 1
The license terms for this product can be found in
/usr/share/doc/mssql-server or downloaded from:
https://go.microsoft.com/fwlink/?LinkId=855864&clcid=0x409

The privacy statement can be viewed at:
https://go.microsoft.com/fwlink/?LinkId=853010&clcid=0x409

Do you accept the license terms? [Yes/No]:Yes

Enter the SQL Server system administrator password:
Confirm the SQL Server system administrator password:
Configuring SQL Server...

The licensing PID was successfully processed. The new edition is [Enterprise Evaluation Edition].
Created symlink from /etc/systemd/system/multi-user.target.wants/mssql-server.service to /usr/lib/systemd/system/
mssql-server.service.
Setup has completed successfully. SQL Server is now starting.
[dbadave@sqllinux01 ~]$
We now have a fully functional SQL Server installation, and a Linux server that can communicate on the domain.
Now it’s time to combine the two and get something more useful.
Our next step is to create a Service Principal Name (SPN) for the instance. We do this on the Windows side, in an elevated command prompt, using the setspn command. We need to provide the FQDN for the Linux Server, as well as the domain account we want to use for SQL Server.
For our particular situation, our SPN command will look like this:
setspn -A MSSQLSvc/sqllinux01.ufp.cloud:1433 sqlservice
Running the command gives us this:
C:\WINDOWS\system32>setspn -A MSSQLSvc/sqllinux01.ufp.cloud:1433 sqlservice
Checking domain DC=ufp,DC=cloud

Registering ServicePrincipalNames for CN=SQLService,CN=Users,DC=ufp,DC=cloud
        MSSQLSvc/sqllinux01.ufp.cloud:1433
Updated object

C:\WINDOWS\system32>
All right, command worked. So far so good. I;m a trust, but verify guy though. So let’s make sure we see the right SPN by using the setspn -l command, passing in the domain account – and see what we get:
C:\WINDOWS\system32>setspn -l sqlservice
Registered ServicePrincipalNames for CN=SQLService,CN=Users,DC=ufp,DC=cloud:
        MSSQLSvc/sqllinux01.ufp.cloud:1433

C:\WINDOWS\system32>
Ok – we’ve validated that the SPN is in place as we’d expect. We’re at the home stretch – just a bit more configuration to do. First, we need to validate the key version number, or knvo, for the service account. To do that, we run the two commands below.
as we learned earlier, kinit obtains and caches the kerberos ticket – although this time we’re running it for a different account, so be sure to have the password for this account handy. knvo will return the key version number needed to complete the rest of the setup. The knvo is generally 2, but we have to validate
kinit sqlservice@UFP.CLOUD
kvno MSSQLSvc/sqllinux01.ufp.cloud:1433
Running the command and entering the password needed gives us this:
[dbadave@sqllinux01 ~]$ kinit sqlservice@UFP.CLOUD
Password for sqlservice@UFP.CLOUD:
[dbadave@sqllinux01 ~]$ kvno MSSQLSvc/sqllinux01.ufp.cloud:1433
MSSQLSvc/sqllinux01.ufp.cloud:1433@UFP.CLOUD: kvno = 2
[dbadave@sqllinux01 ~]$
Alright. Now that we’ve got that out of the way, lets create the keytab file that will tell the SQL Server service how to use the SPN we created earlier. To do that, we use the ktutil command. Let’s use these commands to get us going. You have to run these commands interactively, as opposed to just copying and pasting the whole block. Also be careful about entering in the passwords when prompted, as ktutil does not check if the password is actually valid
[dbadave@sqllinux01 ~]$ sudo ktutil
[sudo] password for dbadave:
ktutil: addent -password -p MSSQLSvc/sqllinux01.ufp.cloud:1433@UFP.CLOUD -k 2 -e aes256-cts-hmac-sha1-96
Password for MSSQLSvc/sqllinux01.ufp.cloud:1433@UFP.CLOUD:
ktutil: addent -password -pnds MSSQLSvc/sqllinux01.ufp.cloud:1433@UFP.CLOUD -k 2 -e rc4-hmac
Password for MSSQLSvc/sqllinux01.ufp.cloud:1433@UFP.CLOUD:
ktutil: wkt /var/opt/mssql/secrets/mssql.keytab
ktutil: quit
Once that’s all done, we need to allow the mssql:mssql user/group that gets created on the linux host after you install SQL Server 2017 to have permissions to read the file. By default, it’s only readable by the root user. That’s fairly straight forward to do, just run the commands.
sudo chown mssql:mssql /var/opt/mssql/secrets/mssql.keytab
sudo chmod 400 /var/opt/mssql/secrets/mssql.keytab
Alright – Now the final thing we need to do to get this thing working. We need to tell SQL Server that we want it start up with kerberos support, and tell it how to find the keytab file we created earlier, and then to restart.
sudo /opt/mssql/bin/mssql-conf set network.kerberoskeytabfile /var/opt/mssql/secrets/mssql.keytab
sudo systemctl restart mssql-server
And we’re done! That’s the end of the configuration needed on the host.
Now let’s test things. First, let’s connect to the instance using the SQL Server instance using sa account, and the password we created earlier. After we connect, let’s try and create a windows user, and then try to connect using my domain account.
When we connect to this server from now on, we need to make sure we need to that we use the fully qualified domain name, otherwise we’ll have errors when trying to connect with windows authorization. In our case it’s sqllinux01.ufp.cloud.
So, let’s see if this works
First, let’s connect to the instance using the sa account, using sqlcmd from my windows 10 machine
C:\WINDOWS\system32>sqlcmd -S sqllinux01.ufp.cloud -Usa -p -Q "select @@version"
Password:
--------------------------------------------------------------------------------
        Mar  2 2018 18:24:44
        Copyright (C) 2017 Microsoft Corporation
        Enterprise Evaluation Edition (64-bit) on Linux (CentOS Linux 7 (Core))

(1 rows affected)

C:\WINDOWS\system32>
OK; that worked as expected. We can log in as the SA account. Now let’s create a new user from Windows. Just to make things a bit more interesting, let’s use a different user than any of the others we’ve tested with. This time, let’s use [UFP\dave], and make them (me?) a sysadmin:
C:\WINDOWS\system32>sqlcmd -S sqllinux01.ufp.cloud -Usa -p
Password:
1> USE [master]
2> GO
Changed database context to 'master'.

1> CREATE LOGIN [UFP\dave] FROM WINDOWS WITH DEFAULT_DATABASE=[master]
2> GO

1> ALTER SERVER ROLE [sysadmin] ADD MEMBER [UFP\dave]
2> GO
All right! Everything looks like it worked. Now let’s test the login using Windows authentication:
C:\WINDOWS\system32>sqlcmd -S sqllinux01.ufp.cloud -E -Q "select suser_sname()"

--------------------------------------------------------------------------------
UFP\dave
(1 rows affected)

C:\WINDOWS\system32>
Wow, looks like we have Windows authentication! Before we get too excited, let’s try with SSMS:


…And we’re in!
We now have a fresh install of Linux and SQL Server 2017, with Windows authentication working! Time for a drink, heh
My next post will show how to add this node, and two others like it, to a 3-node availability group. I’ll also show a few quicker ways for us to do what we did today with setting up Windows authentication. Just this first time we discussed it I wanted to do it the longer way just so we could cover all the steps.
Anyway, thanks for reading – I know it’s a long one.
If you have any questions, or have suggestions for things you’d like to see covered, please reach out!
