I recently had a customer that wanted me to build a multi-node sharded cluster using MongoDB. Simple enough.
However, they also wanted it integrated with Active Directory for authentication & autorization, and wanted to use Kerberos for password-less login.
This was a bit more complicated, and doesn’t seem super-well documented in any one single location.
MongoDB’s documentation will get you started, but has some gaps around bringing together the Windows side, service names, and the host keytab.
This blog post will not be a comprehensive guide to installation and configuration of MongoDB; This will be covered in a future blog post. The assumption here is that we’ve already got a working cluster, and that we want to add AD & Kerberos support.
My goal here is to walk though a practical example of how I got this to work in my home lab environment (and thus my customers).
We’ll actually use many of the things we learned in my previous post on Setting up Windows Authentication on SQL Server 2017 Linux
Our environment:
- 4x Hyper-V VMs, running CentOS 7.5, build 1804; “Infrastructure Server” install. Latest updates applied.
- 3x Data nodes (mongodb[01-03].ufp.cloud)
- 1x Operations Manager node (opsmgr.ufp.cloud)
- Installation is fully-managed by Operations Manager (automation agent)
- Fully functional Active Directory domain, named UFP.CLOUD
Here’s how MongoDB is currently configured:
- MongoDB 4.0.0 Enterprise (Required for Kerberos)
- 3 Shards, replicated across the 3 nodes
- 3 mongos routers (one per node)
- Config database replicated across all 3 nodes
- Data directory set to /data
- mongod user recursively set to owner of /data
- Using defaults of all naming
- *NOT BUILT TO BEST PRACTICES*
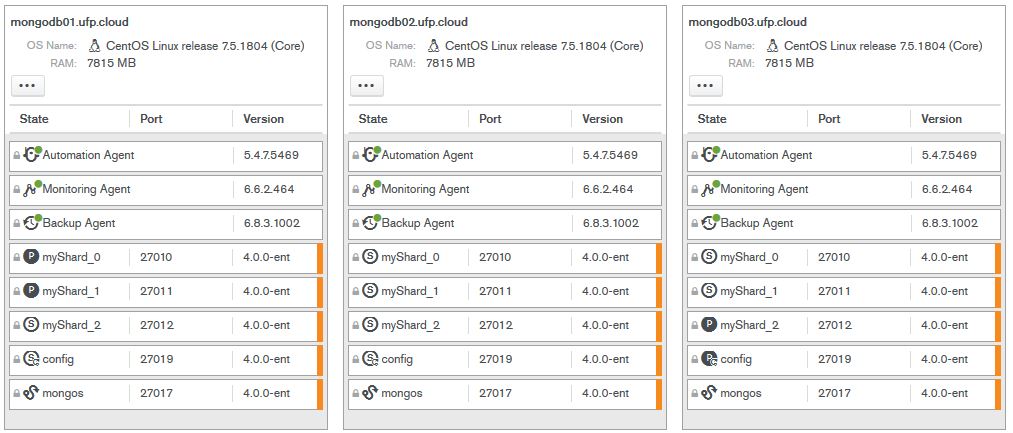
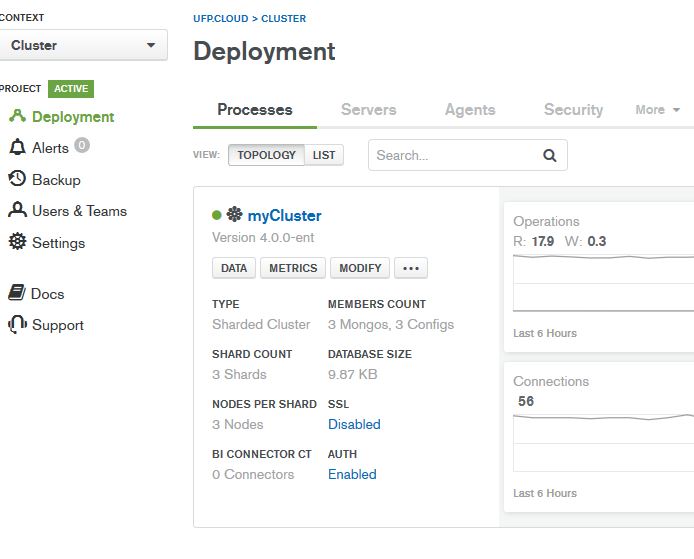
Here’s what it all looks like in Operations Manager:
The basic outline we’re going to follow:
- Machine Prep
- Creating the SPN’s
- Creating the Keytab file
- Add the keytab to the MongoDB configuration
- Enabling Windows Authentication and Authorization
- Creating Roles in MongoDB
- Testing
Alright; let’s get started
Machine Prep:
Our first step is to get the Linux servers prepared for Windows Authentication.
As we learned in my previous article on Setting up Windows Authentication on SQL Server 2017 Linux, this involves installing a few packages, and making sure that our /etc/hosts file is configured correctly.
Since I have already covered the majority of this in the previous post, I will just cover the highlights here.
The prerequisite packages we need to support Windows Authentication on Linux are :
sudo yum install realmd krb5-workstation oddjob oddjob-mkhomedir sssd samba-common-tools
These need to be installed on all 3 nodes. Once we’ve installed the packages, we need to join the domain. Use the command below, substituting a user that has privileges to add computers to the domain. You’ll be prompted for password twice. If you see an error about something DNS related, leave the domain, ensure the .etc/hosts file has the machine’s FQDN and shortname, along with IP, and try again.
sudo realm join ufp.cloud -U 'dbadave@UFP.CLOUD' -v
Once you’ve added all of the nodes to the domain, you should be able to see them in Active Directory Users and Computers:

Now we’re ready to move on to the next step
Creating the SPN’s
This is one of the most critical steps to get right, but also probably the easiest part of the entire process. What we need is an SPN that reflects the service name, FQDN, and the service account we’re going to use for MongoDB. In my case, I want to use a service account called svc_mongodb.
MongoDB is highly configurable, and will allow you to define any service name you want – but to keep things simple, we’ll just use the default of mongodb. You create the SPNs from a Windows machine, using an elevated command prompt, using an authorized account (generally domain admin).
Here’s what I used:
setspn -S mongodb/mongodb01.ufp.cloud svc_mongodb
setspn -S mongodb/mongodb02.ufp.cloud svc_mongodb
setspn -S mongodb/mongodb03.ufp.cloud svc_mongodb
Creating the Keytab file
The steps to create the keytab file follows the same pattern we used before for SQL Server on Linux, using the ktutil command. Here’s the steps (this must be done on each machine individually
- Use kinit to log in as the service account we want to use, and then validate that the SPN works. Make sure to grab the kvno number, since we’ll need it for the next step. It’s generally always 2. Replace the SPN name to match the particular host you’re running the command from.
[dbadave@mongodb01 ~]$ kinit svc_mongodb@UFP.CLOUD
Password for svc_mongodb@UFP.CLOUD:
[dbadave@mongodb01 ~]$ kvno mongodb/mongodb01.ufp.cloud
mongodb/mongodb01.ufp.cloud@UFP.CLOUD: kvno = 2
- Use ktutil to create the keytab, and save it as /data/mongodb.keytab, then adjust permissions on it to make it readable only by the Linux mongod user. Make note to change the addent line to match the host name that you’re on, and be very sure you choose the same wkt path on each host. This makes the next part much simpler.
[dbadave@mongodb01 ~]$ sudo ktutil
[sudo] password for dbadave:
ktutil: addent -password -p mongodb/mongodb01.ufp.cloud@UFP.CLOUD -k 2 -e rc4-hmac
Password for mongodb/mongodb01.ufp.cloud@UFP.CLOUD:
ktutil: wkt /data/mongodb.keytab
ktutil: quit
[dbadave@mongodb01 ~]$ sudo chown mongod:mongod /data/mongodb.keytab
[dbadave@mongodb01 ~]$ sudo chmod 400 /data/mongodb.keytab
Please note the last two commands – this sets the security on theKeyTab file. This has to be very restrictive, as above, otherwise you’ll get errors on trying to start the mongod service.
Add the keytab to the MongoDB configuration
Since our cluster was created and is managed by Operations Manager (which I highly recommend), we don’t want to modify the MongoDB configuration outside of it. Luckily, Operations Manager makes adding cluster-wide settings, such as Kerberos keytab location, super easy.
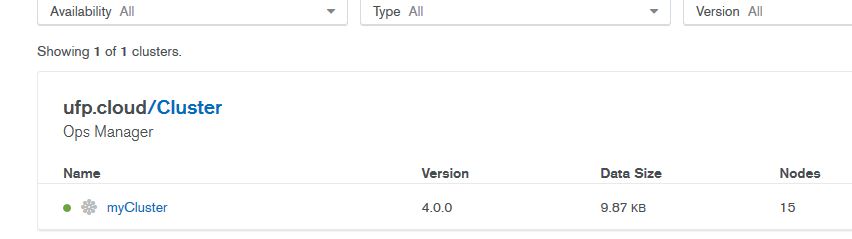
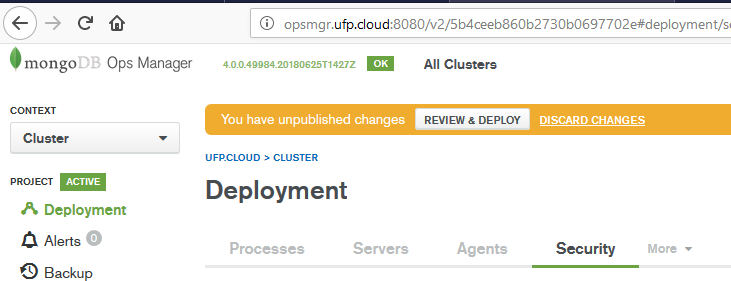
- Log in to Operations Manager, and select your cluster:
- Go to the Deployments tab, and click on “Modify” for the cluster you want to enable AD & Kerberos Authentication on:

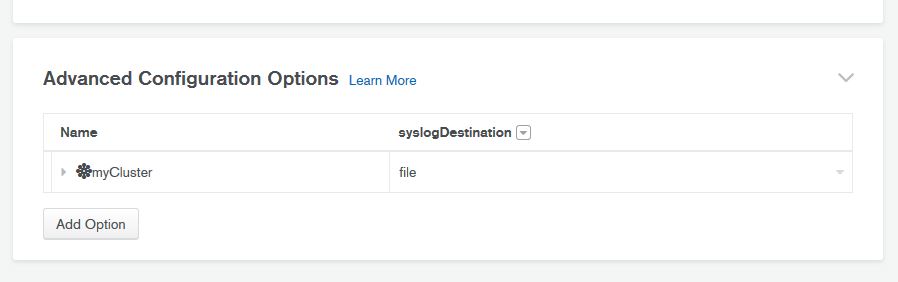
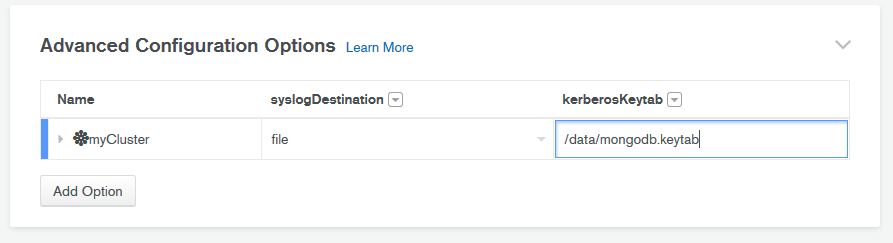
- Choose “Advanced Configuration Options”, and click on “Add Option”
- Select the “kerberosKeytab” option from the rather large list. Previous versions of Operations manager made this process easier, as items were categorized. Not so, any more. You have to wade through the whole list of options to find it
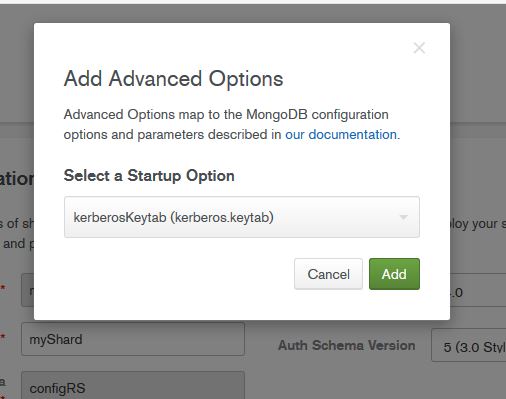
- Enter the path that you used to save the keytab on all the nodes (/data/mongodb.keytab), and then deploy your changes
- Deploy the changes, and wait for successful restart. If you get errors on restart, make sure you’ve set the permissions as above, as MongoDB will not start on a particular node if the permissions on the KeyTab are NOT restrictive enough


Ince we’re back up, let’s move on to the next steps
Enabling Windows Authentication and Authorization
Now that we’ve got the keytab installed on all of the nodes, and set MongoDB to use it, we’re ready to enable Windows & Kerberos Authentication on our cluster.
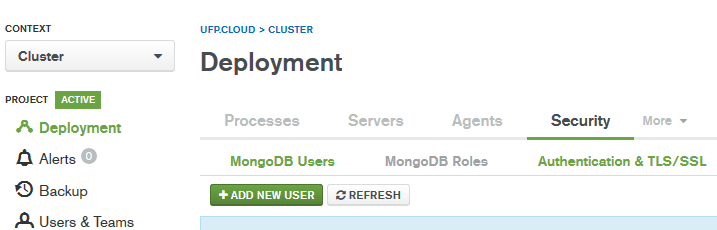
We start by going to Deployments, then Security, and then “Authentication & TLS/SSL”
On this next page, we set up our connection to Active Directory. These settings work for my home lab, but you may need to adjust some of them to work with your domain – particularly the “Transport Security” and the “Bind Method”
We’ll need to enter our domain controllers (kirk.ufp.cloud, picard.ufp.cloud), and an account that’s authorized to query the directory.
In this example, we’re just using the service account we created earlier.

Now that we’ve got that information in there, let’s click next.
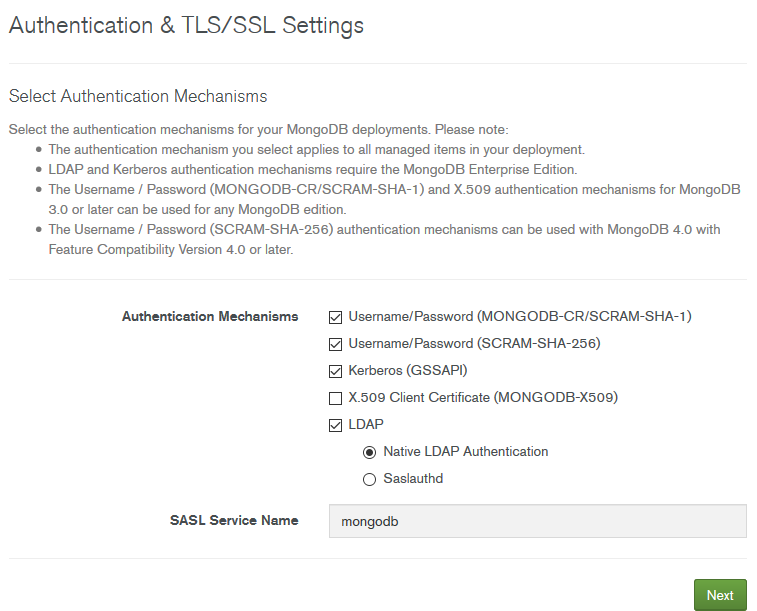
On this page, we select the authentication mechanisms we want to use. In our case, we’re wanting “Username/Password”, “Kerberos (GSSAPI)”, and “LDAP: Native Authentication”, so we’ll go ahead and click those boxes, then hit next.
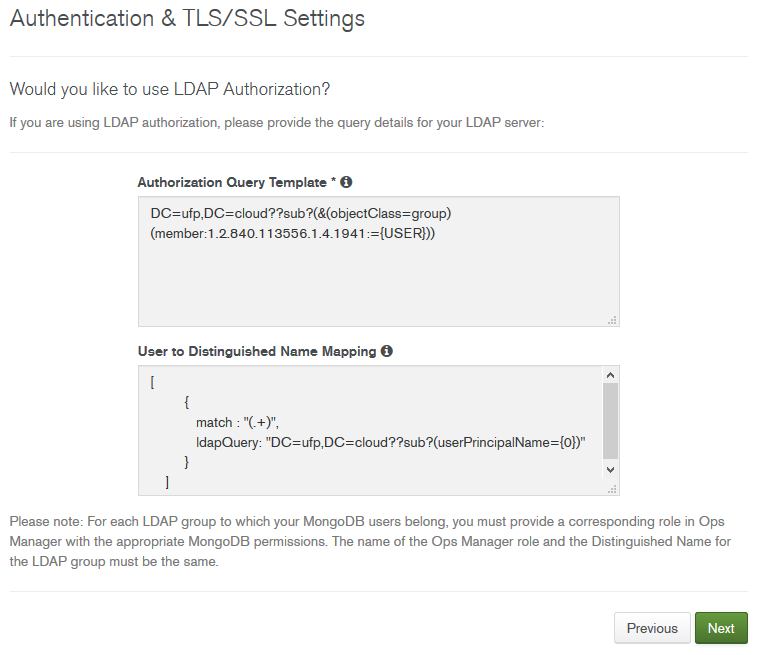
Here’s where the AD magic happens. It’s important to configure this part correctly – As a consultant, the KeyTab and the mappings are the two most common items I see that are misconfigured.
Here’s what we’re doing here:
- Authorization Query Template: This is the LDAP query that will be used to identify which groups a user belongs to, and will be checked against the roles we’ll configure later to validate the user is authorized
- User to Distinguished Name Mapping: This is the query that will be used to discover the full Distinguished Name (DN) of a user, from the User Principal Name (UPN). This allows you to log in to MongoDB using your UPN (generally your email address), and have MongoDB query AD to discover your full DN, and then validate that you’re in a group that is allowed access to MongoDB.
In our example, I’ll log in as dbadave@UFP.CLOUD (note the uppercase – this is important), which maps to the following DN: CN=dbadave,CN=Users,DC=ufp,DC=cloud. This user is then in a group that’s given admin rights to MongoDB
I’ll use a quick PowerShell command to illustrate:
PS C:\Users\dbadave> Get-ADUser -Identity dbadave

DistinguishedName : CN=dbadave,CN=Users,DC=ufp,DC=cloud
Enabled           : True
GivenName         : dbadave
Name              : dbadave
ObjectClass       : user
ObjectGUID        : 6dafb433-5874-447b-a81f-6bd394e6a2af
SamAccountName    : dbadave
SID               : S-1-5-21-3488226428-2329485013-3257030103-1123
Surname           :
UserPrincipalName : dbadave@ufp.cloud
In our case, the example queries on the official documentation works by replacing the placeholder text with our domain name and tld, but in more complex environments we’ll have to make more modifications. Generally, most of my enterprise customers use custom OUs to for their users and groups, so we need to specify those custom OUs in the queries to make sure they’re looking in the right place. I also have to modify the timeout setting we saw before a lot of times. But generally between validating the SPN, the KerberosKeyTab, and the two queries, I’ve been able to get AD/Kerberos working in most every environment.
Once we’re happy with these queries, let’s click Next

We’re not using use TLS/SSL in this example, so let’s just click next

This is setting up authentication for the Operations Manager accounts to connect to MongoDB. We can configure this to use and AD account, but in our case we’ll just Operations Manager create and manage the users
Let’s click on Save, and then deploy the changes, and wait for successful restart. Once we’re back up, let’s create the roles we need
Creating Roles in MongoDB
This is the final step in getting everything to work, and also one of the more misunderstood parts. Instead of defining a user that has rights, MongoDB wants up to specify a role, that has the exact DN of an AD group, to control authentication/authorization.
In my example, I have created an AD group called “MongoAdmins”, and added my userid to it. The first step is to get the full Distinguished Name of the group. We can get this with some real simple PowerShell:
PS C:\Users\dbadave> Get-ADGroup -Identity MongoAdmins


DistinguishedName : CN=MongoAdmins,CN=Users,DC=ufp,DC=cloud
GroupCategory : Security
GroupScope : Global
Name : MongoAdmins
ObjectClass : group
ObjectGUID : 1b82dd47-84fb-4b7b-be01-9135422ee1e3
SamAccountName : MongoAdmins
SID : S-1-5-21-3488226428-2329485013-3257030103-1138
What we need here is the DistinguishedName, which in our case is CN=MongoAdmins,CN=Users,DC=ufp,DC=cloud
With this information, let’s go to Deployment, Security, and then “MongoDB Roles”

Let’s add a new role
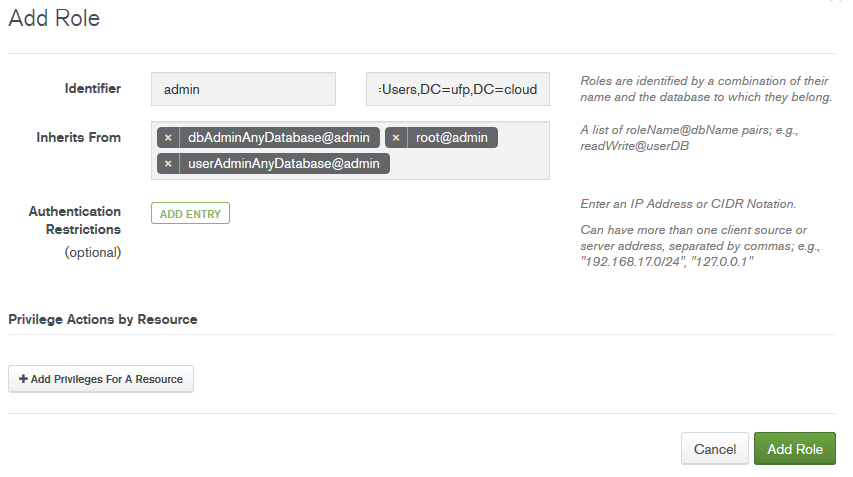
Here’s where we create the role. Since we’re creating an admin user, and we want them to have access to all databases, we’ll do this:
Identifier:
This is where we specify the database and group for the new role we’re creating
- Database – is the MongoDB database we’re adding the role to. In our case, we’ll enter “admin”
- Name – this is where you’ll enter the full DN for the group that we got earlier from the PowerShell query. We’ll enter CN=MongoAdmins,CN=Users,DC=ufp,DC=cloud
Inherits From:
These are pre-defined roles in MongoDB that grant permissions without having to define a custom set. In our case, since this is an admin user, we’ll assign some admin roles
The rest we’ll leave at defaults, and click on Add Role
Next we deploy our changes
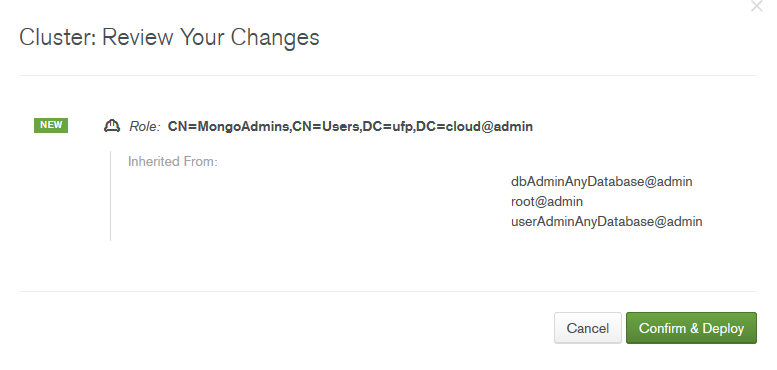
We then validate that we’re just adding a new role, with a few admin level permissions. Click on “Confirm & Deploy”

After deployment, we can see that our role has been successfully added.
Testing
We should now be able to log in to MongoDB, as an admin, via Kerberos, using a member of the “MongoAdmins” AD group, from Windows.
Let’s test that. We’ll need to make sure that we’re using the enterprise version of the mongo client, as this is the only version of the client that supports Kerberos. We’ll also need to make sure we’re constructing our connection string correctly. Let’s see how to do that.
The command we’re going to us is:
mongo.exe admin --username dbadave@UFP.CLOUD --authenticationMechanism GSSAPI --host mongodb01.ufp.cloud --authenticationDatabase $external
Let’s break that down a bit.
- username – The AD User Principal Name if the authorized account. To get passthrough authentication to work, this should be logged in as this account on your Windows machine. The runas command works, too
- authenticationMechanism – This setting tells the client we want to use Kerberos (GSSAPI)
- host – The FQDN (and port, if NOT 27017) of the host to connect to
- authenticationDatabase – This tells MongoDB that this is an external user, and not a local one. This causes MongoDB to query AD to find the user. If you don’t pass this option, you’ll be prompted for a password
Alright – let’s run it and see what we get
C:\Program Files\MongoDB\Server\4.0\bin>mongo.exe admin --username dbadave@UFP.CLOUD --authenticationMechanism GSSAPI --host mongodb01.ufp.cloud --authenticationDatabase $external
MongoDB shell version v4.0.0
connecting to: mongodb://mongodb01.ufp.cloud:27017/admin
MongoDB server version: 4.0.0
MongoDB Enterprise mongos>
And it looks like we’re in!
Let’s make sure we have admin rights, by getting a status of the sharding we set up. Formatting is flattened to make it easier to read.
MongoDB Enterprise mongos> sh.status()
--- Sharding Status ---
sharding version: {
"_id" : 1,
"minCompatibleVersion" : 5,
"currentVersion" : 6,
"clusterId" : ObjectId("5b4d6d86d72b308dee1f0ee3")
}
shards:
{ "_id" : "myShard_0", "host" : "myShard_0/mongodb01.ufp.cloud:27010,mongodb02.ufp.cloud:27010,mongodb03.ufp.cloud:27010", "state" : 1 }
{ "_id" : "myShard_1", "host" : "myShard_1/mongodb01.ufp.cloud:27011,mongodb02.ufp.cloud:27011,mongodb03.ufp.cloud:27011", "state" : 1 }
{ "_id" : "myShard_2", "host" : "myShard_2/mongodb01.ufp.cloud:27012,mongodb02.ufp.cloud:27012,mongodb03.ufp.cloud:27012", "state" : 1 }
active mongoses:
"4.0.0" : 3
autosplit:
Currently enabled: yes
balancer:
Currently enabled: yes
Currently running: no
Failed balancer rounds in last 5 attempts: 2
Last reported error: interrupted at shutdown
Time of Reported error: Tue Jul 17 2018 00:21:20 GMT-0500 (Central Standard Time)
Migration Results for the last 24 hours:
No recent migrations
databases:
{ "_id" : "config", "primary" : "config", "partitioned" : true }
config.system.sessions
shard key: { "_id" : 1 }
unique: false
balancing: true
chunks:
myShard_0 1
{ "_id" : { "$minKey" : 1 } } -->> { "_id" : { "$maxKey" : 1 } } on : myShard_0 Timestamp(1, 0)

MongoDB Enterprise mongos>
…And we’ve got admin rights!
Here’s what it looks like if we run this command as a non-admin, with the most relevant part in bold:
C:\Program Files\MongoDB\Server\4.0\bin>mongo.exe admin --username dave@UFP.CLOUD --authenticationMechanism GSSAPI --host mongodb01.ufp.cloud --authenticationDatabase $external
MongoDB shell version v4.0.0
connecting to: mongodb://mongodb01.ufp.cloud:27017/admin
MongoDB server version: 4.0.0
MongoDB Enterprise mongos> sh.status()
2018-08-08T09:41:07.758-0500 E QUERY [js] Error: error: {
"ok" : 0,
"errmsg" : "not authorized on config to execute command { find: \"version\", filter: {}, limit: 1.0, singleBatch: true, $clusterTime: { clusterTime: Timestamp(1533739254, 4), signature: { hash: BinData(0, 01F45FA247313A866FF5CE95EFD66F629A53257B), keyId: 6579035057246175236 } }, $db: \"config\" }",
"code" : 13,
"codeName" : "Unauthorized",
"operationTime" : Timestamp(1533739254, 5),
"$clusterTime" : {
"clusterTime" : Timestamp(1533739254, 5),
"signature" : {
"hash" : BinData(0,"AfRfokcxOoZv9c6V79ZvYppTJXs="),
"keyId" : NumberLong("6579035057246175236")
}
}
} :
MongoDB Enterprise mongos>
And there we have it. We’ve now got AD Authentication/Authorization & Kerberos configured and working with MongoDB and Operations Manager
Summary
I know this was a long post, but as I mentioned before, I really didn’t find a great resource that brought all of the elements together in a step-by-step manner. The MongoDB official documentation is pretty close, but doesn’t walk through the KeyTab part, or the identification of the DNs for users/groups – nor does it cover doing this in Operations Manager.
I mainly put this together as a way to help me document the process, but I hope someone else finds it useful
-Dave
